Item - Item Rights and Measures Tab
Items > Item Management > (Select Item) > Item Rights and Measures
This screen is used to indicate warehouse rules, different units of measure, and how each unit of measure is used in the system.
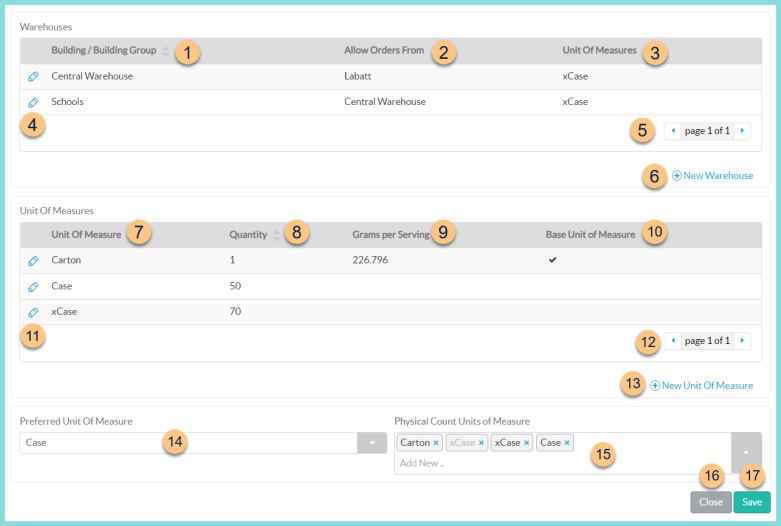
Warehouses
This section is used to specify which warehouse(s) can order from which suppliers and by which unit(s) of measure for items with the Inventory attribute. This section only appears for items with the Inventory or Purchased attributes.
-
Building/Building Group - click to sort by building or building group
Note: The buildings and building groups in this column cannot overlap with each other -
Allow Orders From - notice the vendor or warehouse that can be ordered from
-
Unit of Measures - notice the unit(s) of measure that can be ordered
-
Pencil - click to edit an existing warehouse rule
-
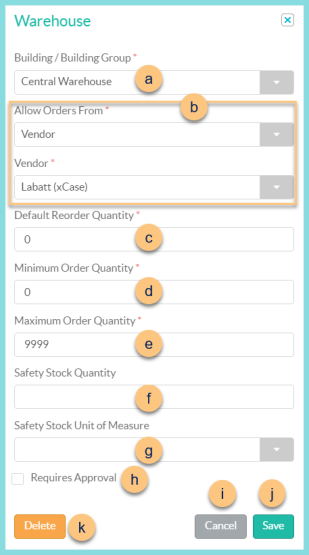
Building/Building Group - Select the building or building group to which this warehouse rule applies (Note: Buildings and building groups cannot overlap across multiple warehouse rules)
-
Allow Orders From - select the entity type that the building or building group can order from
Central Kitchen
Central Kitchen - select the Central Kitchen that applies to this warehouse rule
Unit Of Measures - select the unit(s) of measure that can be ordered in this warehouse rule
Vendor
Vendor - select the vendor and unit of measure combo that applies to this warehouse rule
Note: Only one vendor and unit of measure can be selected. Use this field to toggle between different vendors as needed (ex: USDA vs. commercial product suppliers).Warehouse
Warehouse - select the Warehouse that applies to this warehouse rule
Unit Of Measures - select the unit(s) of measure that can be ordered in this warehouse rule
None - this option is available on items that contain both the Recipe/Simple Recipe attribute and the Inventory attribute. Choose this option if a warehouse needs to be able to count inventory and do item adjustments on an item but does not order the item from another entity (typically central kitchens)
-
Default Reorder Quantity - enter the default quantity to order
-
Minimum Order Quantity - indicate a minimum quantity that must be ordered if required (default: 0)
-
Maximum Order Quantity - indicate a maximum quantity that can be ordered if applicable (default: 9999)
-
Safety Stock Quantity (optional) - indicate a quantity that should be in stock at any time for the selected building/building group (PAR level)
-
Safety Stock Unit of Measure - select the unit of measure for the Safety Stock Quantity if applicable
-
Requires Approval - check to require approval if this item appears on the order or transfer
-
Cancel - click to return to the previous screen without saving changes
-
Save - click to create the warehouse rule
-
Delete - click to remove the warehouse rule
-
< > - click to scroll through pages
-
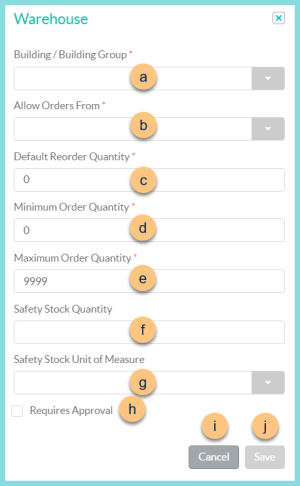
(+) New Warehouse - click to add a new warehouse rule
-
Building/Building Group - Select the building or building group to which this warehouse rule applies (Note: Buildings and building groups cannot overlap across multiple warehouse rules)
-
Allow Orders From - select the entity type that the building or building group can order from
Central Kitchen
Central Kitchen - select the Central Kitchen that applies to this warehouse rule
Unit Of Measures - select the unit(s) of measure that can be ordered in this warehouse rule
Vendor
Vendor - select the vendor and unit of measure combo that applies to this warehouse rule
Note: Only one vendor and unit of measure can be selected. Use this field to toggle between different vendors as needed (ex: USDA vs. commercial product suppliers).Warehouse
Warehouse - select the Warehouse that applies to this warehouse rule
Unit Of Measures - select the unit(s) of measure that can be ordered in this warehouse rule
None - this option is available on items that contain both the Recipe/Simple Recipe attribute and the Inventory attribute. Choose this option if a warehouse needs to be able to count inventory and do item adjustments on an item but does not order the item from another entity (typically central kitchens)
-
Default Reorder Quantity - enter the default quantity to order
-
Minimum Order Quantity - indicate a minimum quantity that must be ordered if required (default: 0)
-
Maximum Order Quantity - indicate a maximum quantity that can be ordered if applicable (default: 9999)
-
Safety Stock Quantity (optional) - indicate a quantity that should be in stock at any time for the selected building/building group (PAR level)
-
Safety Stock Unit of Measure - select the unit of measure for the Safety Stock Quantity if applicable
-
Requires Approval - check to require approval if this item appears on the order or transfer
-
Cancel - click to return to the previous screen without saving changes
-
Save - click to create the warehouse rule
Units of Measure
This section is used to specify various units of measure of the item and how each unit of measure can be used. The base unit of measure will already exist if the inventory and/or purchasing attribute(s) have been selected. Proceed to Step 11 to finish the configuration of the base unit as outlined below.
-
Unit of Measure - notice the unit of measure name (sorted alphabetically by default)
-
Quantity - click to sort by the Quantity of the Base Unit of Measure contained in the named Unit of Measure
-
Grams per Serving - notice the grams per serving (recipes only)
grams per serving = ingredient weight / yield -
Base Unit of Measure - notice the indicated base unit of measure
-
Pencil - click to edit an existing unit of measure
-
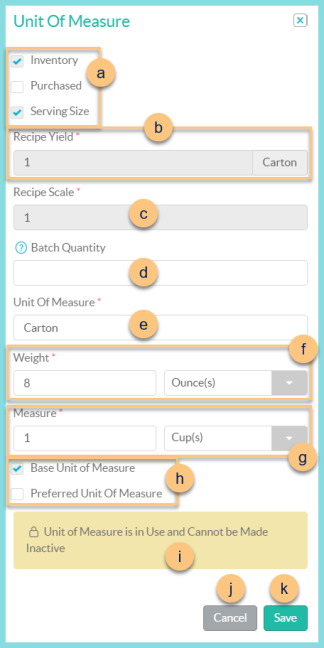
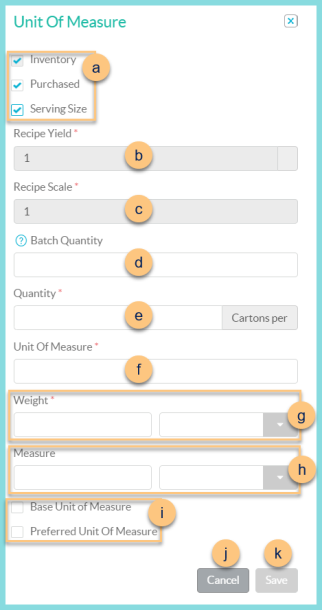
Select the uses that apply. Available uses are based on the item's attributes.
Ingredient - select if this unit of measure will be used in complex recipes
Inventory - select if this unit of measure will be counted in inventory
Note: this use will be selected automatically if the Purchased use is selected
Published - select if this unit of measure will be available in the online store
Purchased - select if this unit of measure can be purchased from the vendor(s)
Serving Size - select if this unit of measure can be planned on menu plans and production records -
Recipe Yield (Recipe, Simple Recipe) - enter the number of servings yielded from the quantity of the ingredients on the Ingredients tab (Default: 1 if Simple Recipe)
-
Recipe Scale (Recipe, Simple Recipe) - enter the multiple of servings that must be prepared at one time (Default: 1 if Simple Recipe) Ex. A recipe scale of 8 on a Slice of pizza means that the recipe for pizza slices will print in multiples of 8.
-
Batch Quantity (Recipe, Simple Recipe) - enter the maximum number of servings that can be made per batch (Note: This must be a multiple of the recipe scale.)
Quantity (not pictured - Inventory, Purchased) - enter the number of the base unit of measure contained in this unit of measure -
Unit Of Measure - Name the unit of measure (Ex: Each, Case, #10 Can, Package, 1/2 Cup Serving, Container, etc.)
Measure Description (not pictured - Ingredient) - The Measure Description is used to delineate the difference in weight between different consistencies of items, i.e. Shredded Cheese vs. Melted Cheese. -
Weight (required) (Ingredient) - enter the weight of the named unit of measure and select the weight type
-
Measure (optional) (Ingredient) - enter the volume of the named unit of measure and select the volumne type
Note: providing a measure that corresponds to the weight allows an ingredient to be used in recipes as any weight or volume -
Unit of Measure Functions (each function can only be used on one unit of measure)
Base Unit of Measure - check this box if this unit of measure is the Base Unit of Measure (Note: The Base Unit of Measure indicator cannot be moved between units of measure.)
Preferred Unit Of Measure - check this box if this unit of measure is the preferred unit. This unit of measure is used on Pick List Reports. -
Active - toggle active status or notice a message about inability to deactivate
-
Cancel - click to return to the previous screen without saving changes
-
Save - click to save changes
-
< > - click to scroll through pages
-
(+) New Unit of Measure - click to create a new unit of measure
-
Select the uses that apply. Available uses are based on the item's attributes.
Ingredient - select if this unit of measure will be used in complex recipes
Inventory - select if this unit of measure will be counted in inventory
Note: this use will be selected automatically if the Purchased use is selected
Published - select if this unit of measure will be available in the online store
Purchased - select if this unit of measure can be purchased from the vendor(s)
Serving Size - select if this unit of measure can be planned on menu plans and production records -
Recipe Yield (Recipe, Simple Recipe) - enter the number of servings yielded from the quantity of the ingredients on the Ingredients tab (Default: 1 if Simple Recipe)
-
Recipe Scale (Recipe, Simple Recipe) - enter the multiple of servings that must be prepared at one time (Default: 1 if Simple Recipe) Ex. A recipe scale of 8 on a Slice of pizza means that the recipe for pizza slices will print in multiples of 8.
-
Batch Quantity (Recipe, Simple Recipe) - enter the maximum number of servings that can be made per batch (Note: This must be a multiple of the recipe scale.)
-
Quantity (not pictured - Inventory, Purchased) - enter the number of the base unit of measure contained in this unit of measure
-
Unit Of Measure - Name the unit of measure (Ex: Each, Case, #10 Can, Package, 1/2 Cup Serving, Container, etc.)
Measure Description (not pictured - Ingredient) - The Measure Description is used to delineate the difference in weight between different consistencies of items, i.e. Shredded Cheese vs. Melted Cheese. -
Weight (required) (Ingredient) - enter the weight of the named unit of measure and select the weight type
-
Measure (optional) (Ingredient) - enter the volume of the named unit of measure and select the volumne type
Note: providing a measure that corresponds to the weight allows an ingredient to be used in recipes as any weight or volume -
Unit of Measure Functions (each function can only be used on one unit of measure)
Base Unit of Measure - check this box if this unit of measure is the Base Unit of Measure (Note: The Base Unit of Measure indicator cannot be moved between units of measure.)
Preferred Unit Of Measure - check this box if this unit of measure is the preferred unit. This unit of measure is used on Pick List Reports. -
Cancel - click to return to the previous screen without saving changes
-
Save - click to save changes
Note: Items 14 and 15 are only available on items with the inventory attribute.
-
Preferred Unit of Measure - select the unit of measure that will be used on Pick List Reports.
-
Physical Count Units of Measure - select the unit(s) of measure to be counted on Physical Counts and Item Adjustments
-
Close - click to return to the Item Management screen without saving changes to items 14 and 15.
-
Save - click to save changes to items 14 and 15.